Tuesday, May 23, 2017
Taking Orders!
My online store is up and running. Check out what I have for sale. Click on the link at the top of the home page that says "Store".
Currently, I only have my Nap Time Mat up for sale. However, I plan on adding more items as I am able. Please subscribe to my blog for updates emailed to your inbox. We will never abuse your email address and you can unsubscribe at any time.
Nap Time Mat!
 For Mother's Day, I decided to make a nap mat for my sister and my niece. It was actually pretty simple to make once I figured out how I wanted to do it. I found this adorable flannel print at Wal-Mart that was just so soft and perfect for the outer cover. The attached blanket is super soft to the touch.
I made some changes to the original pattern idea. Instead of using quilting batting for the padding, I found a roll of one inch foam that ended up being perfect. It was much easier to work with and it was way softer and more supportive. The length is shorter and I made a smaller pillow. The next ones I make will be about 40 inches for the sleeping part and a full 12 inches for the pillow. This should be plenty of room for a child to sleep on (over three feet long) and the pillow part will be much larger (I think this one I made was about 7 inches).


I have started taking orders if there is anyone interested in a nap mat of their own. Click the link at the top of the page that says "Store".
Monday, May 15, 2017
New Fabric!
Can't wait to start working on some more projects with this super-sweet fabric that I picked up today:


Tuesday, May 2, 2017
A Stylish Polo
I thought that my second project would go a little bit easier, and in a way, it did. But in many other ways, it didn't. Mad props to Peak-A-Boo Pattern Shop for this really dope Classic Polo pattern.
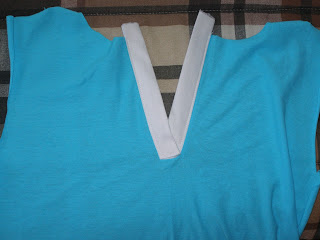 Construction wise, this was way easier than the Oxford. Less parts to put together and the placket was surprisingly intuitive. I thought that was going to be the hardest thing for me, but it really wasn't. The collar gave me some problems, where my fabric pinched a little bit in a couple of places where the body and collar attach but the collar hides it. The first sleeve I put on was a little shaky but the second one went on beautifully and I think I'm getting the hang of things.
 Confession time...I initially sewed the button holes on the wrong side of the placket. I'm just so glad I realized what I did before actually cutting the holes. It took me forever and a day to pick the stitches out with a seam ripper. Thankfully, I had bought large buttons for the little bit I was not able to get, in fear of ripping my fabric, is hidden.
Working with a jersey knit was kind of a pain in the butt. When you cut that stuff, it likes to roll in on itself, making sewing a hem a nightmare. When it came time to sew together my body and sleeves on the inside seam, I wanted to set that thing on fire and be done with it. I even tried ironing it flat, but no amount of coaxing would work. I was so frustrated with it that I just sewed things up as best I could. And the hem on the bottom is atrocious. I am very embarrassed at the job I did on it, but I had had enough at that point. I ran out of bobbin thread about six inches from finishing that hem and wanted to punt my machine out the window.
 What adventures...I definitely got some major experience on this little project. The only sad part for me is...that it doesn't fit me. It is a child's pattern so obviously I can't fit in it. I really love these colors and want one for myself. Maybe I can find a polo pattern for men and give it another go!
Fabric and buttons were from Hobby Lobby - jersey knit in aqua and white. They were both $6.99 per yard. The buttons were on sale for like $0.90.

 Confession time...I initially sewed the button holes on the wrong side of the placket. I'm just so glad I realized what I did before actually cutting the holes. It took me forever and a day to pick the stitches out with a seam ripper. Thankfully, I had bought large buttons for the little bit I was not able to get, in fear of ripping my fabric, is hidden.
Working with a jersey knit was kind of a pain in the butt. When you cut that stuff, it likes to roll in on itself, making sewing a hem a nightmare. When it came time to sew together my body and sleeves on the inside seam, I wanted to set that thing on fire and be done with it. I even tried ironing it flat, but no amount of coaxing would work. I was so frustrated with it that I just sewed things up as best I could. And the hem on the bottom is atrocious. I am very embarrassed at the job I did on it, but I had had enough at that point. I ran out of bobbin thread about six inches from finishing that hem and wanted to punt my machine out the window.

Fabric and buttons were from Hobby Lobby - jersey knit in aqua and white. They were both $6.99 per yard. The buttons were on sale for like $0.90.
 |
| The Finished Polo |
Subscribe to:
Posts (Atom)